| Table of Contents |
|---|
Objective
...
General information
The basic workflows
The user, who has either write- or admin-level access, wishes to add, modify
...
, replace, or remove Entities and Attributes in
...
their Ellie.
The current Import feature offers
...
three options:
...
I want to ADD entities or attributes to Ellie
I want to REPLACE entities or attributes in Ellie
...
Insert, Update, and Delete.
...
Each of the options is meant for different use cases.
...
The Insert workflow is for adding
...
new entities and attributes to Ellie. This workflow doesn’t change or remove any existing ones.
Both of these processes offer a file for download, but they have different objectives. ADD is for exporting the whole Ellie Glossary and adding new entities and attributes. REPLACE is for downloading an empty template and replacing the current suborganization content with it.
| Warning |
|---|
Replacing will fail if the Entities you are replacing are in use in a Model. If you attempt to import an Excel file that would delete an Entity that is in use in a Model, you will be shown a warning from Ellie and the import process will halt. |
Simple explanation of the process
You have Entities and Attributes in your organization. In order to modify this content, first export an Excel file from Ellie. Modify and save the Excel file. Import the Excel file into Ellie, preview what it looks like, receive a backup Excel file of the current state, and finish the importing process.
Notes of interest
...
The
...
Update workflow updates the existing entities and/or attributes but doesn’t add anything new or remove any existing content.
The Delete workflow is used to delete existing entities and/or attributes but doesn’t allow inserting or updating.
All of these processes involve downloading a file, but the file templates are a little different to ensure the desired results. The template file for the Insert workflow gives you an empty file with the correct header information so you can just fill in the necessary new entities and attributes. The file for the Update workflow gives you a file that has your current entities and attributes listed with their IDs. You can make changes to this file, but any deletions or additions in this file will be disregarded when the file is uploaded. The template file for the Delete workflow has a separate column for explicitly marking entities or attributes to be deleted, to make sure that nothing gets deleted by accident.
How the overall process works
Step 1: Navigate to the Import/Export Glossary page
Step 2: Download the file of your chosen workflow.
Step 3: Update the file as intended.
Step 4: Upload the file to Ellie.
Step 5: Check that everything is as expected.
Step 6: You have now completed the Insert/Update/Delete process.
Important notes
Do not modify the structure of the files (i.e. no new or altered columns or sheets). If you wish to change some of the metadata properties (e.g. a column name on the sheet), please contact support@ellie.ai.
When exporting an Excel file with numbers on it on macOS, it is important to untick/deselect “Include a summary worksheet”
...
if such an option is presented: otherwise the Excel file will be incompatible with the Ellie importing process and cannot be uploaded back.
When
...
Inserting new entities or attributes, all IDs will be automatically generated by Ellie.
When Updating existing entities or attributes, you cannot edit the ID.
When modifying your Attributes sheet, in case you wish to add new attributes to a pre-existing Entity with the Insert workflow, make sure the Entity ID is retained across all rows of Attributes. That way your Attribute rows are associated with the Entity of your choice
...
Let’s see what all of this looks like in Ellie.
Both the Export and Import functions are accessed via the Dashboard of your organisation. Make sure you have Admin level access to your organization, otherwise the dropdown menu below will not be displayed.
...
Step 1: Click on Import glossary from the dashboard menu.
...
Here are the steps for ADD and REPLACE:
ADD
...
To add entities or attributes to your Ellie glossary, follow the steps below:
Export your existing entities and attributes by clicking on the Export glossary button in the lower region of the page.
Edit the downloaded .XLSX file, adding the Entities and Attributes you wish to add to the organization glossary.
Save the Excel file, return to the import page and Preview the file by clicking on the Preview file button below.
Confirm that the Preview is accurate and that you wish to continue the import process - your pre-existing data will be backed up and sent to you before the process finishes.
REPLACE
...
To replace your existing Ellie glossary, follow the steps below:
Download your template for uploading Ellie glossary data by clicking on the Download template button in the lower region of the page.
Update the downloaded .XLSX file with the entities and attributes you want to import.
Save the Excel file and Preview the file by clicking on the Preview file button below.
Confirm that the Preview is accurate and that you wish to continue the import process - your pre-existing data will be backed up and sent to you before the process finishes.
Crucial details to know about these features
during the importing, a backup file is always created as a part of the process - making it possible for you to revert in case you are not happy with the results of the import.
attributes may also be deleted from Ellie during the import process - if you removed Attributes from an Entity with Excel, they will be removed from your Organization Glossary.
The suggested workflow
Click on the cog in the middle of the screen - a dropdown menu will open.
Click on Import glossary.
Select ADD or REPLACE.
If you clicked on ADD, click on the Export glossary button and start editing the Excel file.
If you clicked on REPLACE, click on the Download template button and start editing the Excel file.
You will see a two sheets inside the Excel file, Entities and Attributes.
Make your modifications to the file and save the file in Excel format.
Return back to Ellie and click on the Preview file button to start previewing.
If you are happy with the preview, click on the Next button.
In order to proceed in the process, a backup of the current organization will be downloaded - click on the Backup glossary button to proceed.
Click on the Confirm button to Confirm your import.
Import is now complete.
The [REPLACE] Importing Process
Here is what a downloaded Template file looks like (Showing both the Entities and Attributes sheets)


If you wanted to add five entities (Entity 1 to Entity 5) and an attribute for each entity, you would proceed like this:
Add Entity 1 to Entity 5 to the Entities sheet, into the Entity label column.
Add any extra metadata you wish to add to these new entities. (Description, Examples, Synonyms, Source systems, Administrated by)
Add Entity 1 to Entity 5 to the Attributes sheet, into the Entity label column.
Start adding Attribute information to the Attribute label, Description, Data type, Source systems, Source columns, Contraints, Notes.
| Note |
|---|
Important: do not touch the Entity ID or Entity Type columns in the Entities sheet. |
Here is an example where Entity 5 also has 3 additional Attributes instead of the normal one attribute added.


Now, save the Excel file and Preview it with Ellie.
Since your suborganization was empty, the import was validated without any warnings or errors:
...
The Attributes are also the correct amount (5 entities with a total of 7 attributes).
...
You can safely click on the Next button.
...
You are now prompted to proceed by clicking on the Backup glossary button.
One more check:
...
Please be sure to click on the Confirm button.
...
Import is now complete! You can see the correct amount of data - all Entities have at least one import Attribute, but the fifth Entity has 3 import Attributes.
Repetition: New attributes added into the file do not need to have Attribute ID, you must leave that column empty on the added rows.
The [ADD] Importing process
Here is an example of what a downloaded Export glossary Excel might look like:
...
Ellie has automatically assigned Entity IDs for each Entity. The user has changed the Entity types. If you want to add more Entities, just add more rows, not touching the Entity ID or Entity type. The process is very similar to the [REPLACE] Importing Process.
We have decided to add NewEntity and NewEntity2 to the Entities sheet, and to the Attributes sheet.
...
As always, Entity ID and Attribute ID are kept empty. If we wanted to add one more Attribute to the Entity 5 ID, we would simply create a new row, write Entity 5 into the Entity label and start adding the Attribute Label, Description, Notes, Data type, Constraints, Source table, Source columns and Source systems content.
Then we save the Excel file, and return back to Ellie.
Click on the Preview file button. A file selection dialog window opens, and you can pick the Excel file you saved and click on “Open” or “OK”, depending on your browser and operating system.
After this, Ellie chews through your file and shows you a Preview.
...
The above is an example of a successfully validated Excel file, that has 9 Attributes mapped to 8 Entities. You can review the import data (use the scrollbar at the bottom of the screen to review all the columns of data you want to import into your organization) to make sure everything is as you expect it to be.
...
If the data is not as you expected it to be, you can click on the button that says Return to front page and cancel the importing process. In case you have another version of the attribute file, click on Preview another file, and browse for it.
If, on the other hand, you are happy with the preview, just click on the Next button.
...
Clicking on Backup glossary button will send you your current Organization Glossary content, and proceed with the importing process. You will immediately receive an Excel file that contains the unmodified Glossary index. Be sure to keep this file in a safe place, should you ever wish to revert the changes you are about to make.
You will then be taken to the fourth page, where-in you Confirm that you want to import the x attributes to y entities.
...
By pressing the Confirm button, you state your wish to overwrite the current Entities / Attributes with your modified Entities / Attributes.
Congratulations! You have now successfully imported your content into Ellie.
...
.
The Insert workflow
Insert - step 1: Navigate to the Import/Export menu
Use either the cogwheel menu on the Dashboard (available if you’re an admin) or the Import/Export button on the Glossary List (available for both admin and write users)to navigate to the front page of the Import/Export feature, or use
...
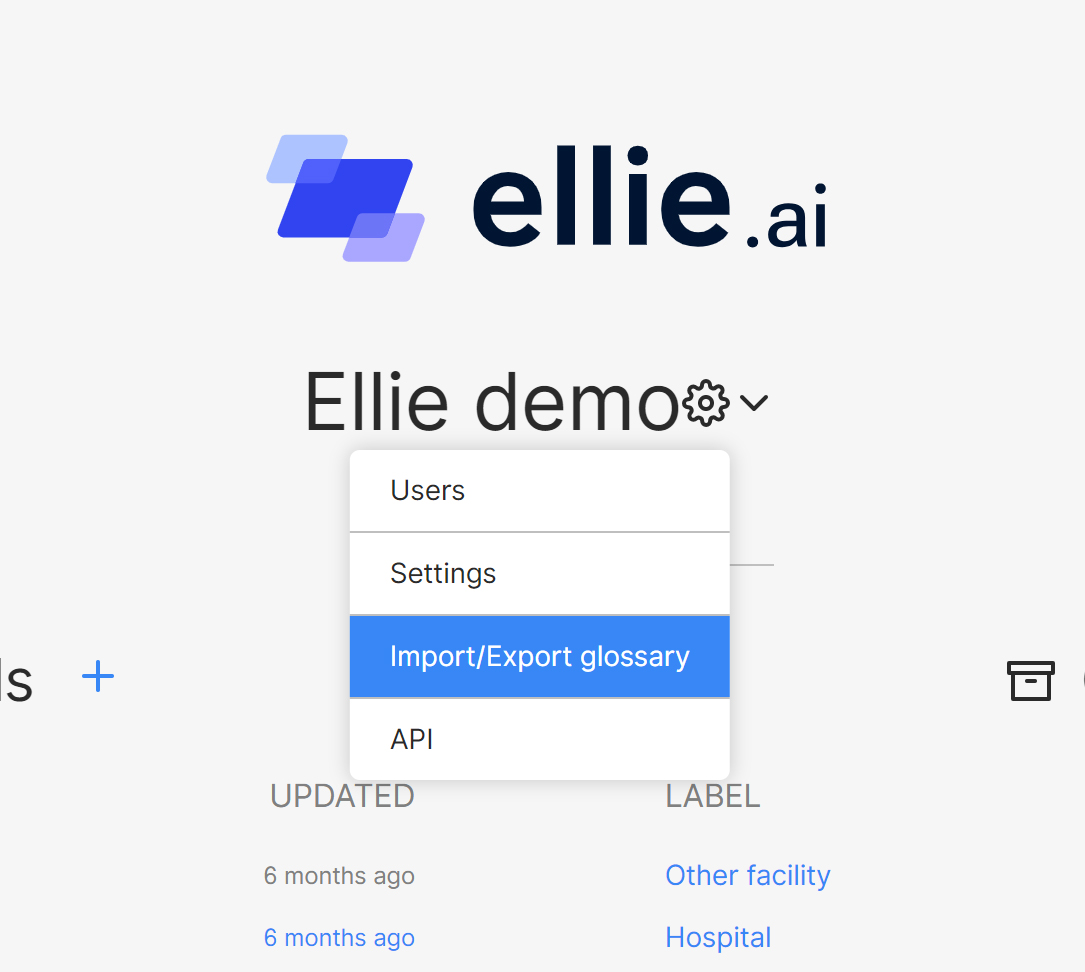
Insert - step 2: Download the file template for Insert
Choose “Download Template” from the Insert card. This downloads an .xlsx file which you can save on your computer.
...
Insert - step 3: Edit the file
Open the downloaded .xlsx file and add the entities you want to include to your glossary. You can add any information you like to the columns given in the spreadsheet - this is the metadata for the entity or attribute that will be shown in Ellie’s UI.
Note that Entities and Attributes are on separate sheets of the file.
...
Insert - step 4: Upload the file
Click Insert on Ellie’s UI and choose the edited file from your computer.
...
Insert - step 5: Confirm changes & check for errors
Ellie will display a list of the additions you made, and show any errors that might have been identified in the file. Note that entities and attributes are shown on different tabs.
If errors have been detected, they will be listed here, and you will have the opportunity to re-upload your file once you’ve fixed the issues in it.
Click Confirm if everything looks good, otherwise, choose Cancel to stop the workflow and go back.
Note that actual changes are only made after you click Confirm! After clicking Confirm, you can’t undo your changes anymore.
...
Insert - step 6: Done!
You have now successfully added new entities and/or attributes to Ellie!
...
The Update workflow
Update - step 1: Navigate to the Import/Export menu
Use either the cogwheel menu on the Dashboard (available if you’re an admin) or the Import/Export button on the Glossary List (available for both admin and write users)to navigate to the front page of the Import/Export feature, or use
...

Update - step 2: Export the current glossary
Choose “Export Glossary” from the Update card. This downloads an .xlsx file containing everything in your current Ellie glossary, i.e. all the entities and attributes with all their metadata.
...
Update - step 3: Edit the downloaded glossary file
Update the entities and attributes and their metadata as you see fit in the .xlsx file you downloaded.
Note: you can’t add or remove entities or attributes in this workflow. Any such changes will be ignored when you upload the file back. Also, the entity/attribute IDs can’t be edited.
...
Update - step 4: Upload the edited file
Using the “Update” option in the Export/Import UI, upload the file you edited into Ellie.
...
Update - step 5: Confirm changes & check for errors
Ellie will display a list of the updates you made, and show any errors that might have been identified in the file. Note that entities and attributes are shown on different tabs.
If errors have been detected, they will be listed here, and you will have the opportunity to re-upload your file once you’ve fixed the issues in it.
Click Confirm if everything looks good, otherwise, choose Cancel to stop the workflow and go back.
Note that actual changes are only made after you click Confirm! After clicking Confirm, you can’t undo your changes anymore.
...
Update - step 6: Done!
You have now successfully updated your entities and/or attributes!
...
The Delete workflow
Delete - step 1: Navigate to the Import/Export menu
Use either the cogwheel menu on the Dashboard (available if you’re an admin) or the Import/Export button on the Glossary List (available for both admin and write users)to navigate to the front page of the Import/Export feature, or use
...
Delete - step 2: Export the current glossary
Choose “Export Glossary” from the Delete card. This will download an .xlsx file containing the entire Glossary of your Ellie, with all its entities and attributes.
...
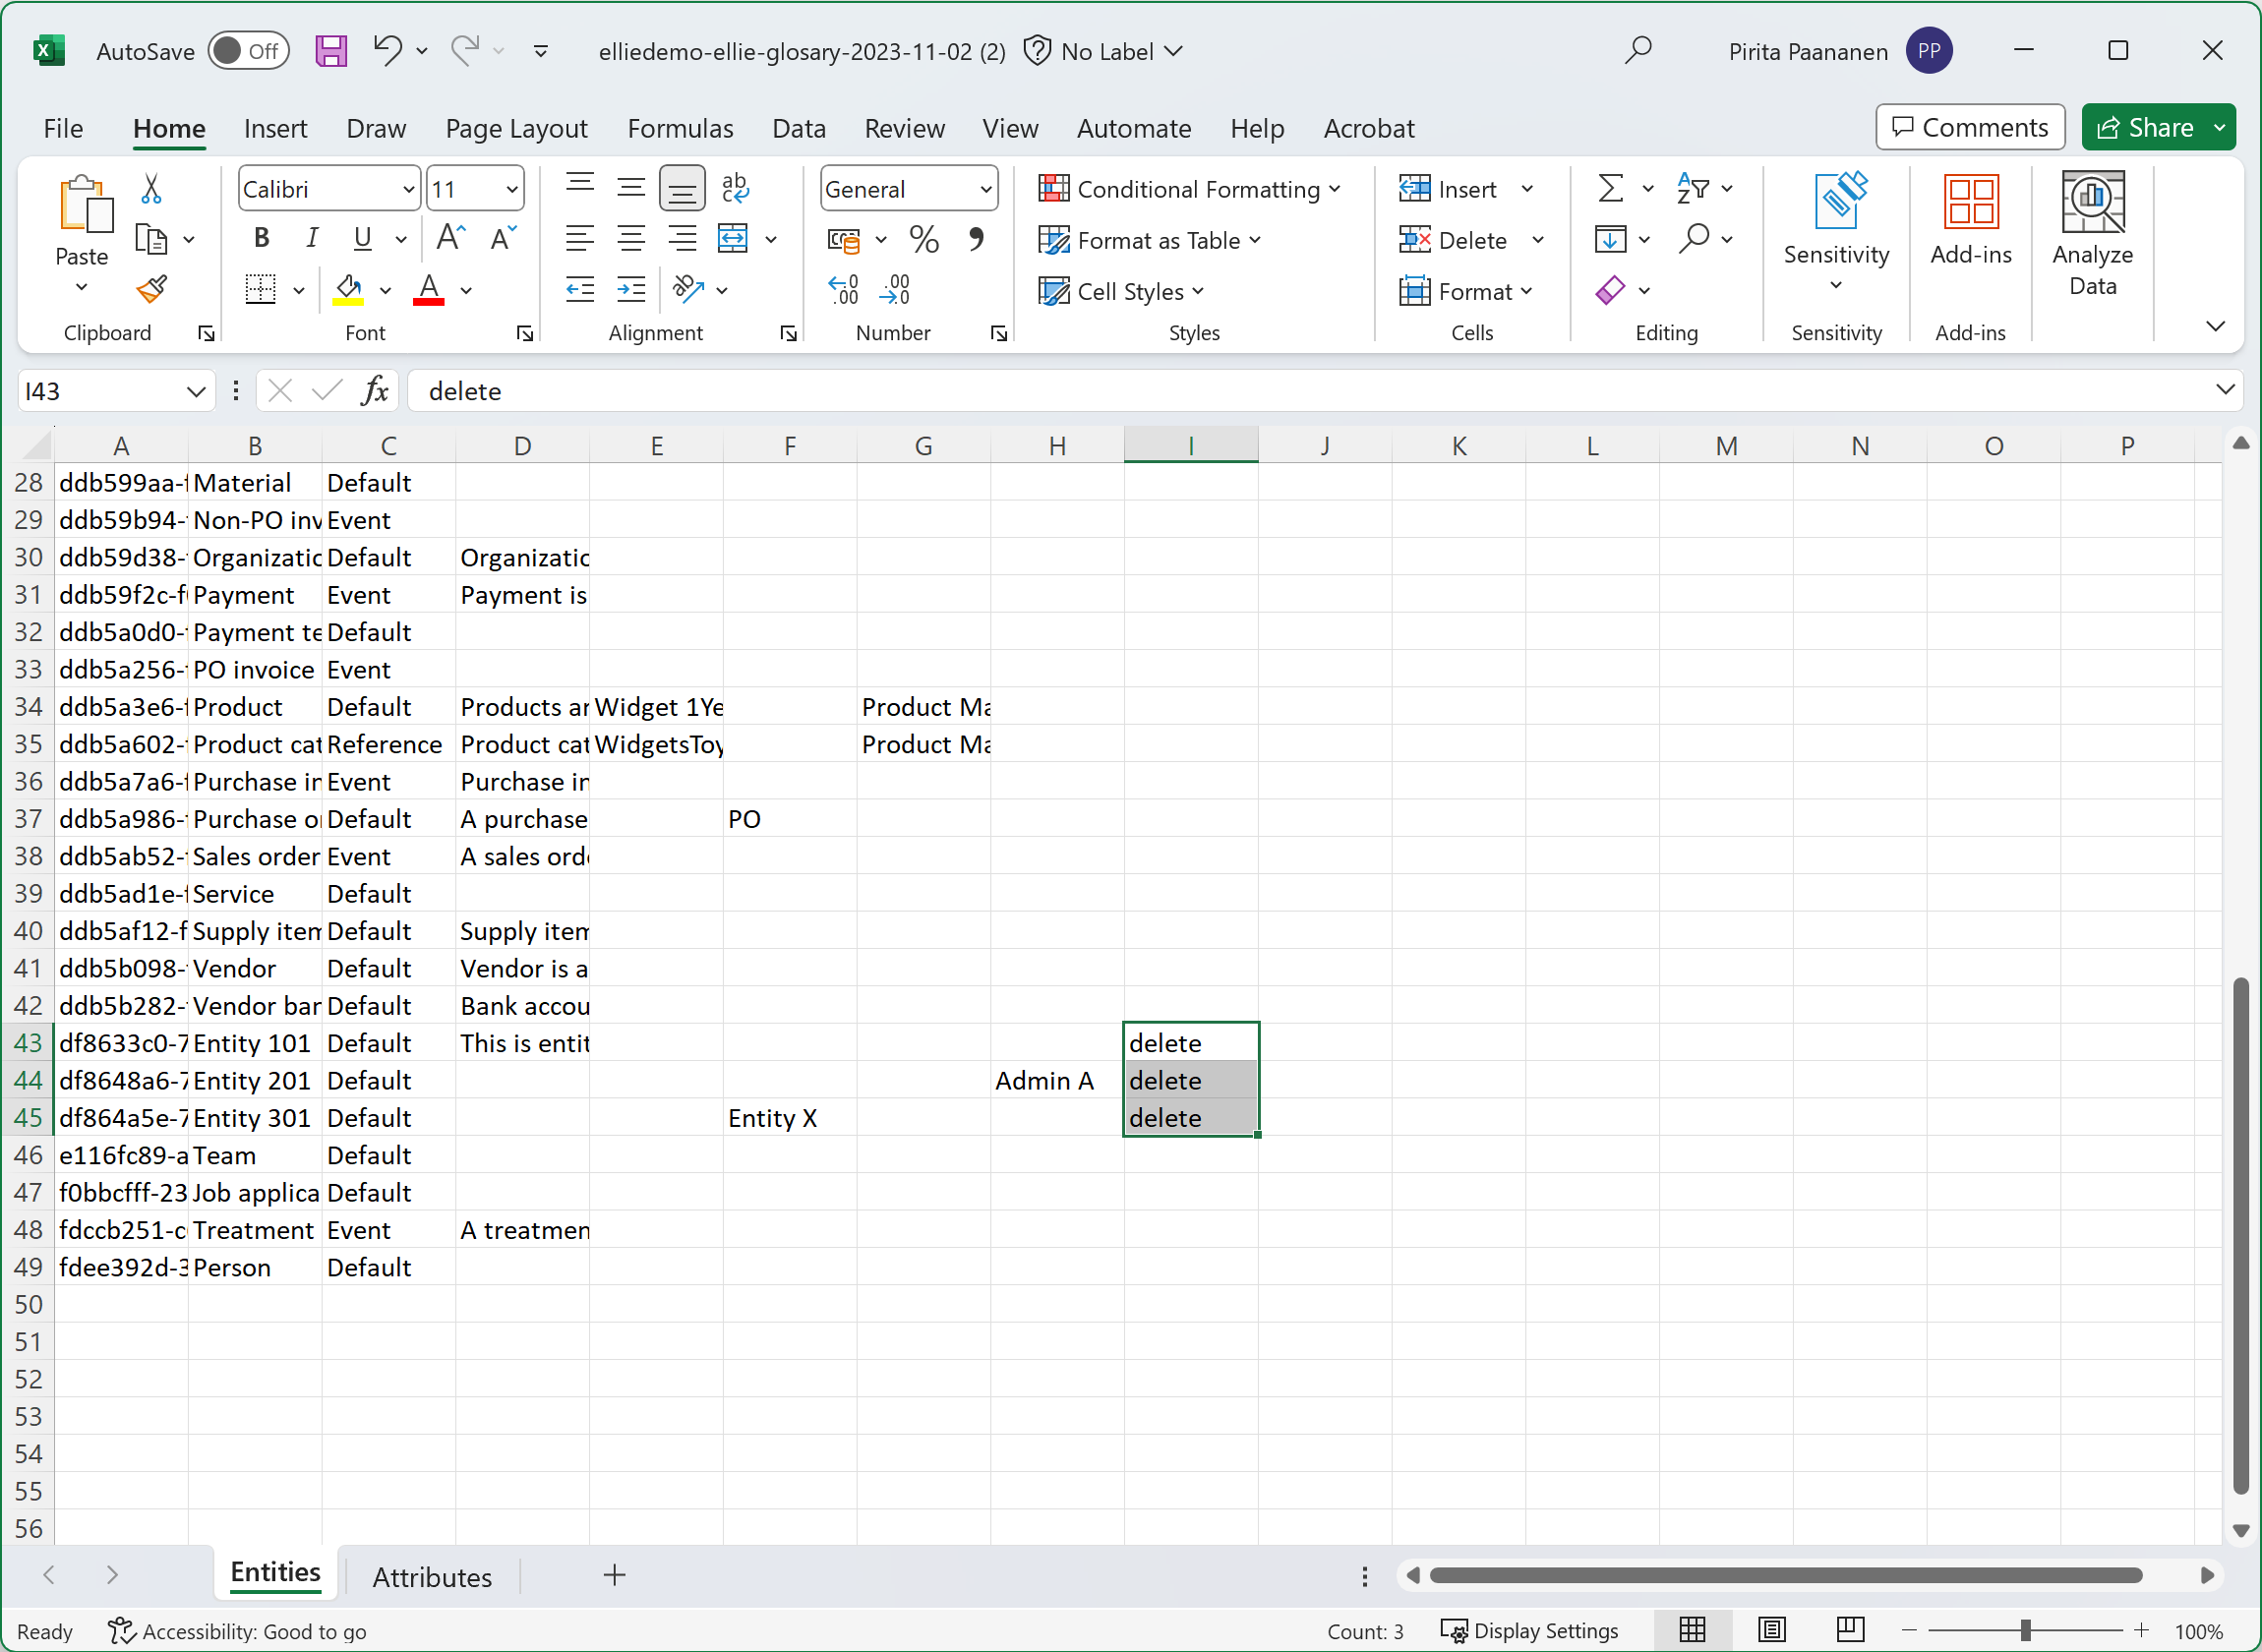
Delete - step 3: Mark entities/attributes for deletion
In the file that you downloaded, you’ll find one extra column: “deletion”. Mark the entities intended for deletion in the .xslx file by adding the word “delete” into this column for the entities and/or attributes you want to remove.
Note that this is the only way to delete entities or attributes - removing rows from the file will not do anything! We want the delete operation to be stated very clearly so that no-one deletes anything important by accident.
...
Delete - step 4: Upload the edited file
After you’ve marked the necessary entities and/or attributes to be deleted, you can upload the file back to Ellie by using the “Delete” button in the Delete card on the UI.
...
Delete - step 5: Confirm changes & check for errors
Ellie will display a list of the deletions you made, and show any errors that might have been identified in the file. Note that entities and attributes are shown on different tabs.
If errors have been detected, they will be listed here, and you will have the opportunity to re-upload your file once you’ve fixed the issues in it.
Click Confirm if everything looks good, otherwise, choose Cancel to stop the workflow and go back.
Note that actual changes are only made after you click Confirm! After clicking Confirm, you can’t undo your changes anymore.
...
Delete - step 6: Done!
You have successfully deleted entities and/or attributes from your Glossary!
...